Introduction
Creating a DIY projector screen frame is an excellent project for anyone looking to enhance their backyard movie experience. This guide provides a comprehensive walk-through of building a frame using affordable and easily accessible materials, specifically PVC pipes. This project not only offers a fun and engaging DIY activity but also results in a functional addition to any home entertainment setup. By following the steps outlined, you can construct a sturdy and reliable frame for your projector screen, ensuring countless nights of movie enjoyment under the stars.
Materials Needed for Projector Screen Frame
To build your own DIY projector screen frame, gathering the right materials is key. This setup is cost-effective, and the materials are easy to find at your local hardware store or home center. Make sure you have everything on hand before you start, to make your project run smoothly.
List of PVC Components
For the frame construction, you’ll need:
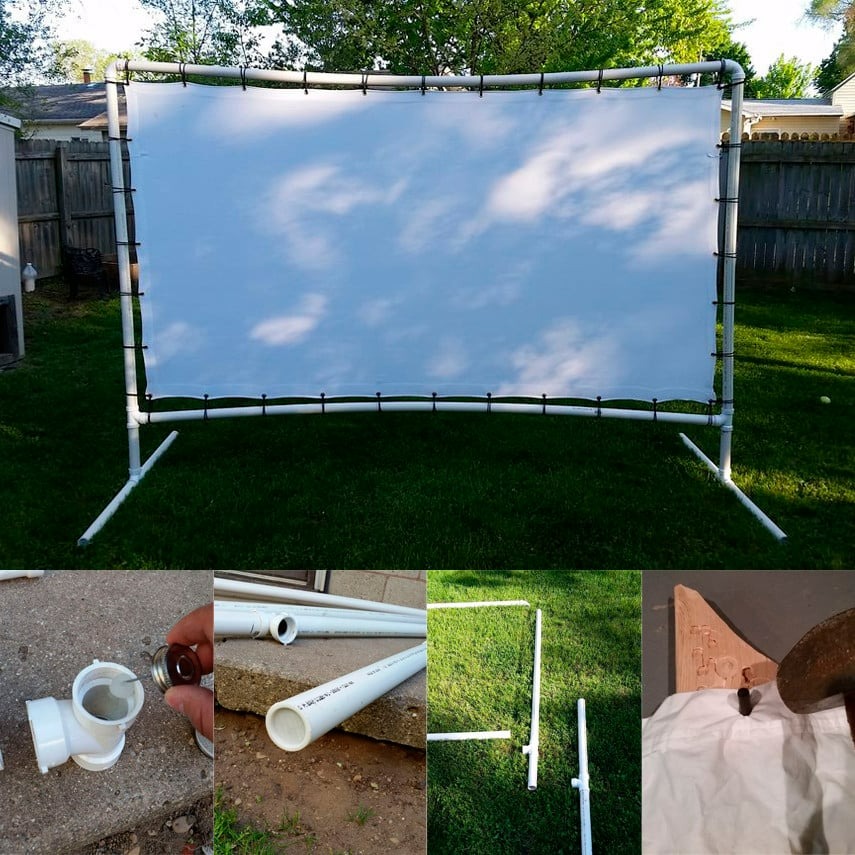
- Four 3/4″ PVC pipes, 10 feet in length, Sch. 40
- Four 3/4″ PVC elbow fittings
- Four 3/4″ PVC union fittings
- Four eye bolts with washers and nuts to secure the corners
- Bungee cords for mounting the screen
These PVC components are crucial for a sturdy and durable frame. The pipes provide the structure, while the elbows and unions will connect every piece securely.
Tools Required
In addition to the PVC materials, you’ll need a set of tools to measure, cut, and assemble the frame:
- A tape measure to determine the correct lengths
- Hand saw or miter saw for cutting the PVC pipes to size
- Drill with drill bits to install eye bolts
- PVC cement to bond the pieces together
If you don’t own these tools, borrowing from a friend or renting from a local shop is a budget-friendly option. With these tools, you’ll be all set to follow the step-by-step guide for constructing your DIY projector screen frame.
Step-by-Step Guide
Now that you have all the necessary materials and tools, let’s dive into the DIY projector screen frame construction process step-by-step. This guide is designed to make the assembly as straightforward and enjoyable as possible.
Measuring and Marking
First, lay out the PVC pipes on a flat surface. Measure the projected screen size and add 6 inches to each dimension. This extra space ensures the screen fabric is taut when mounted. Using a marker, clearly mark the pipes where they will be cut. Accuracy here will help in the stability of your frame.
Cutting the PVC Pipes
With the measurements marked, it’s time to cut. Hold the pipe steady on a flat surface. Using a hand saw or a miter saw, cut where you marked. Ensure each cut is straight to keep the frame aligned properly.
Assembling the Frame Corners
Now, take the PVC elbows and glue them to the ends of your longest PVC pipes. These horizontal pieces will form the top and bottom of your frame. PVC cement works best for a strong hold. Coat the inside of the elbow and the end of the pipe evenly, then press and twist them together. This method secures the connection.
Attaching the Eye Bolts
To secure the frame for hanging, attach eye bolts at each corner. First, drill a slightly oversized hole at a 45-degree angle in the corner. Then, place the bolt through the hole, securing it with a washer and nut on the other side. Do this for all four corners.
Screen Installation Process
Position the frame on a flat surface. Begin by attaching one side of the screen to the frame using bungee cords or strong string. Thread it through the screen’s grommets, then around the frame. Continue this process on the remaining sides of the frame. Keep the tension even to avoid wrinkles or sags in the screen fabric. Finally, tighten all strings to ensure the screen is well-fitted and taut.
Setting Up the Projector Screen
Once you have your DIY projector screen frame built, it’s time to lace the screen. This process is crucial. It ensures the screen is secure and displays images without distortion. Find a spacious area to lay out the frame and screen.
Lacing the Screen
Start by attaching the screen to your frame at one corner using string or bungee cords. Pass the string through the eye bolt or union fitting to keep it in place. Use a bowline knot for strength. Go around the frame, thread through each grommet on the screen’s edge. Work diagonally across the frame to maintain balance. When all four corners are connected, check to ensure the screen isn’t skewed.
Tightening and Adjusting
The final step involves tightening the strings. This evens out tension and prevents wrinkles. Start from one corner and gently pull the string, moving to the next corner. Continue this until you’ve gone all the way around the frame. Adjust the strings as needed for a flat, taut surface. Make sure the screen is centered within the frame. With a well-fitted screen, your movies will look clear and professional.
Final Setup for Movie Night
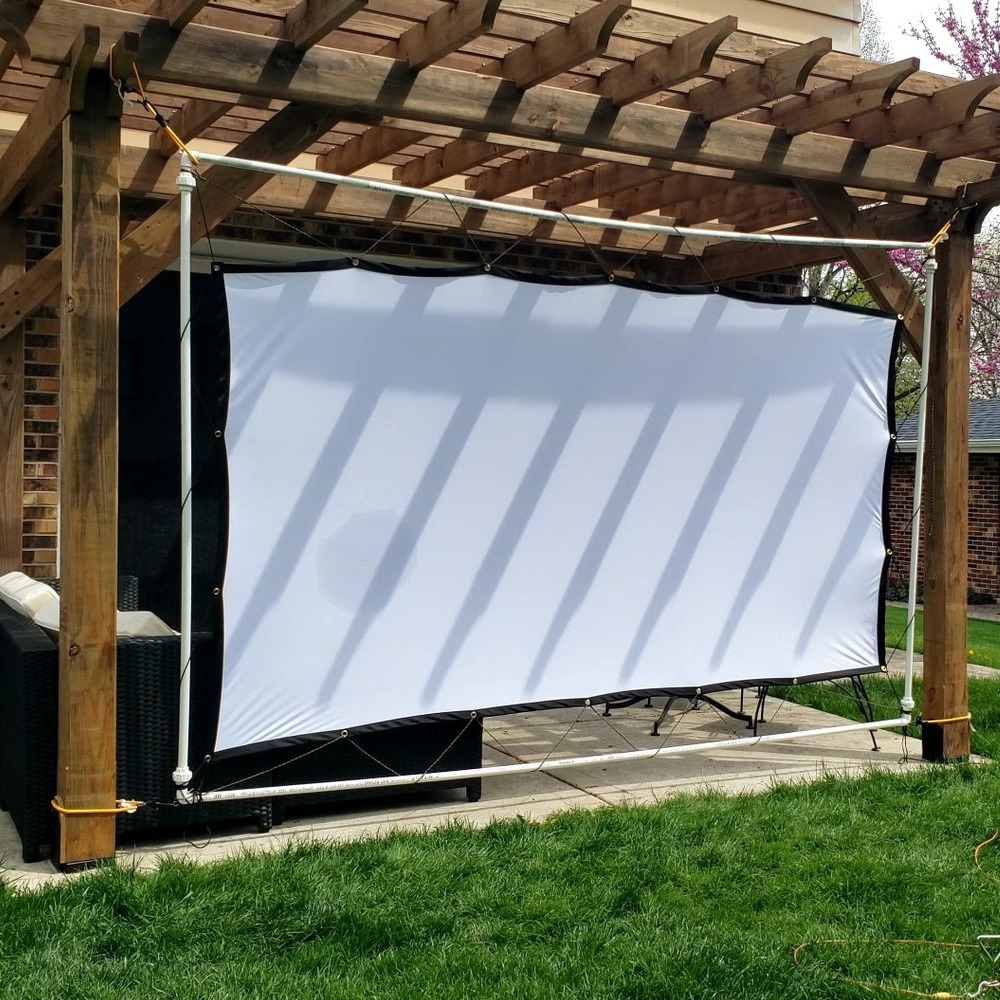
You’ve built your frame, and it’s ready for the main event. Setting up for movie night is easy. With everything in place, all that’s left is to mount the frame and connect the projector. This will turn your backyard into a personal movie theater.
Mounting the Frame
Choose your location carefully for the best viewing experience. You may use a wall, a pergola, or even trees. Secure your frame with the bungee cords through the eye bolts. Make sure the frame is stable. Adjust the height so viewers can see the screen without any obstruction.
Connecting the Projector
Place your projector so it lines up with the center of the screen. Check that the distance from the projector to the screen matches its recommended throw distance. This ensures a clear image. Connect the projector to your video source. This could be a laptop, DVD player, or streaming device. Lastly, connect the audio. Use speakers for sound that matches the big screen experience.
Once your DIY projector screen frame is mounted and your projector is connected, grab some popcorn. Sit back, relax, and enjoy movie magic under the stars.
Conclusion
Congratulations on completing your DIY projector screen frame! You’ve just combined simplicity, affordability, and functionality into a single project. By following the 8 easy steps, you’ve crafted a durable frame that’s perfect for hosting movie nights right in your backyard. The lightweight yet sturdy PVC materials make this frame a reliable support for your projector screen. Plus, the ease of assembly means you can take it apart and store it when not in use.
With your new frame ready, all you need is a dark evening, a good movie, and some company to make the most of your home theater setup. Remember, this frame can be customized to fit any screen size, so feel free to adjust the dimensions for a perfect fit. The DIY route also allows you to enjoy the satisfaction of handcrafting something useful while saving money.
With simple materials, you can build a durable frame that fits your space perfectly. We hope this guide has made your DIY projector screen frame journey straightforward and enjoyable. Keep this guide handy for future reference, and don’t hesitate to explore more DIY projects to enhance your movie-watching experience. Happy viewing!